Making plants grow inside Ikea Kallax furniture
| Published | |
| Reading time | 9 minutes |
| Licence |  |
| Tags | www.my-life.com - Plants - Semi - IKEhack - Proofread by an LLM |
Reader: I don’t have the time to read, what are you talking about?
Blogger: I plant peppers and show how I turned an Ikea Kallax into a greenhouse for my apartment. It’s cool and works great. I hope, I still don’t have any peppers.

The beginning, plants
I have recently developed a new interest: plants! It’s cool and makes the room nicer. However, this new hobby takes time and requires attention. Also, I need to confess that my final score is not great. This clearly proves I’m still a padawan. I’m currently in the learning phase and I try to learn as much as I can from my mistakes.
- Too much water here
- Not enough water over there
- Not enough light on this one
- Too much water here as well
- Pot too big there
- Drawing for the last one
Anyway, I learn day by day. Except maybe about watering, where I think I may have a sadistic wish to drown my plants. I don’t see any other explanations.
Seeing plants grow is pleasing and brings enjoyment to me. However, the market’s offering of plants seems to always revolve around the same kinds. Once you have a Monstera, Yucca, Ficus, or Pachira, stores seem to always have the same things.
This has sparked a new interest for me: growing my own plants. Ideally, exotic ones that are not often seen here.
Obviously, I’m the very first in the world to grow such an interest, and I’m also the very first to try this experience. What an original I am!
The beginning II, seeding
Here I am in a new world, the world of cultivation. How does one make seeds sprout? I can already hear you saying it’s easy: Put the seed in the ground, pour some water, and wait!
Nope. If it were so simple, there would be no science, nor would there be industrial agronomy :-p. As a young padawan, you can guess I went in almost blindly anyway with little to no thought and just put seeds in good soil, then patiently waited!
Indor sprouting
I’m an urban dweller, living in Paris in a typical Haussmann-style apartment. My windows face south and west, but I don’t receive a lot of sunlight during the day. Despite these challenges, I’m determined to make plants thrive and sprout in less-than-ideal conditions.
To summarize:
- Low light
- Indoors
- Any time of the year because I’m not patient!
The beginning III, first fail test : Flamboyant
I recently bought Flamboyant (Delonix regia) seeds, a beautiful tree!

First issue: It’s a big tree and needs to live outside. These problems will of course be problems for future me. Good luck, future me!
Second issue: It needs a lot of light. Therefore, it probably won’t fully grow in my little flat unless I use growing lights.
Here I am searching for good growing lights compatible with a living space.
Artificial indor Sun
On Amazon, I found lots of options using LED lights. I chose a random one with 8 LED strips and a timer allowing for automatic switching on/off of the light. For 50 € I went for it to try.


I don’t provide any links, but you can easily find these products yourself with different prices and options. I set up everything basically in a square of one of my existing furniture, an Ikea Kallax lying around in my living room.

Seeding
I am now ready to seed, but as I’m really ignorant, I decide to look around on the internet to seek some advice. I find this page. I read and learned that I need to “scarify” seeds then put them in water for two days.
“Scarify” means grinding the seed to remove the outer layer that usually protects the seed interior. They explain everything here.
This process will help the sprouting of the seed. As I didn’t have any sandpaper to do it, I skipped this step and directly put the seeds into water.
I did not take pictures, but after two days, each seed was clearly opening with a little extra white/green tips on one side. It was like it was sprouting already.
Finally, I put each seed in potting soil, one seed per pot. I used the most basic potting soil I could find at a local store.
Sprouting
Out of all the seeds (10, I think), only two sprouted and only one survived more than two days.
Score of 1/10 for my first try.


The ultimate sacrifice
Once the Flamboyant sprouted, I moved it near the window for better lighting. LEDs are good, but the sun is best anyway, even in my situation.

This is the last known picture of my little Flamboyant, still alive. A few weeks later, all the leaves died, and it stopped growing… forever.
Flamboyant conclusion
It is obvious it didn’t have enough light to grow. The Flamboyant needed more than I could give it, using the growing light or the real sun through the window. Moreover, I need to be careful with watering. The cause of death is not clear, but with the lack of light, drowning was probably not helping the plant to thrive.
The beginning IV, second test: Pili Pili
While cooking, I kept some seeds of a small pepper called “bird’s eye chili” or Pili Pili. Tasty, spicy, and good looking.

Online, I found out that like the Flamboyant, you need to leave the seeds in water for 12 hours before seeding them. Also, sprouting is best between 28°C and 30°C, and the temperature needs to be stable and go down below 20°C.
My living room temperature does not go under 20°C, so there’s no issue there. But I’m not really fond of living in a 28-30°C living room. Therefore, I tried to create a heated greenhouse.
Kallax heated greenhouse
I built the greenhouse with the same tools as before but assembled differently. Instead of having 8 LED strips spread over different squares, I put all of them in one. I added aluminum foil to reflect light and heat radiation. The goal is to get the most out of the light and radiation emitted by the LED strips. The Kallax is black; by itself, it would have absorbed most of the light not directly reaching the plants. Having the aluminum foil helped as most rays of light had another chance to hit a plant.


I made that with what I had lying around. I screwed old towels to almost seal off the back and front of the squares. The front towel is only screwed at the top, allowing me to raise it to look inside. This is not sealed perfectly, but I hope it will reduce enough airflow to allow the temperature to rise to 28-30°C.
Another cool thing: once closed, the light inside does not bother me anymore in the living room. Days of a purple-lighted living room are over. I will be able to set up the timer without any bother from the light when I watch a movie.
I set up a temperature and light probe and started a timer cycle.

This is not perfect, but we can clearly see that when the lights are on, the temperature stays around 29°C which is enough. If I disable the timer (and live the light always on), the temperature says.
Bird’s eye chili seeding & sprouting

With such temperatures, I quickly seeded all my Pili Pili. Given my last success rate (1/10), I put between 3 and 5 seeds per pot. I had hopes of getting some of them to sprout, at least one per pot.
In only a few days, the first sprouting happened. This time, I had almost a 100% success rate.


With so many seedlings, I decided to conduct some tests by leaving one mini greenhouse in the lighted square, and one beside the window. We can clearly see the impact of growing lights after just a few days. My window does not let enough sun in.


Repotting
After a few days, when all the true leaves started to grow, I decided to repot all the seedlings as they had already outgrown their pots. I did not expect all seeds to sprout and grow like that in each and every pot.
I tried to separate some plants, but many of them were already intertwined. I took the cautious path and left some of them as is to reduce the risk of losing any.
This choice may have consequences in the future. We’ll see; I’m confident future me will keep you informed!


Kallax greenhouse PAF improvement
The next step after the first towel prototype was to enhance the PAF (Partner Acceptance Factor) of the solution. Make it less ugly for a living-room space. Who would like to have such a horrible, ugly towel thing near your TV or your best decorating thing.

Ikea sells doors that feel ideal for this purpose. Moreover, the door comes with a complete seal of the square, making the full square sealed up from both front and back. Perfect!

Without hesitating, I get one to test it. After following thoroughly the really long and complex manual, here I am with a closed square with Growing LED lights inside. I took the time to put aluminum foil on each side as before, including the door. This last part is more important than it looks. (More details on the next episode)


I find the result clean and okay. The PAF definitely increased. Performance is also a win.

More doors will be acquired to further increase the PAF of the other squares and finally remove this ugly towel.
The beginning, conclusion. Will I have pepper to eat ?
You (almost) already have all the technical information to answer this question by yourself. But, I did not explain how to do the math. This will be the next article’s main focus, to include more science into the mix. I will also explain how I chose the LED strips for the 3rd square, with some hints to make better choices in this regard.
I’m still a young padawan, so don’t take all I write too seriously as I’m in the learning process. Of course, I don’t really know if I will have any fruit one day as all plants are still growing right now. But if the science I found works, I have a non-zero chance to have some.
Thanks reading me,
Bisoux 😗
P.S.: This article was written when I was still living in Paris. I have since moved to a brighter place that will have some (hopefully good) consequences.
| Title | Making plants grow inside Ikea Kallax furniture | ||
| Description |
| ||
| Published | |||
| Updated | |||
| Type | |||
| Reading time | 9 minutes | ||
| Words | 1812 | ||
| Translation | English | https://blog.ztec.fr/en/2024/post/semi-saga/the-beginning-kallax-as-greenhouse/ | |
| Français | https://blog.ztec.fr/2024/post/semi-saga/le-debut-serre-kallax/ | ||
| Tags | www.my-life.com - Plants - Semi - IKEhack - Proofread by an LLM | ||
| Licence | Except for quoted materials, which retain their original rights and attributions, this post and its content are published under the Creative Commons(CC BY-NC-SA 4.0) liscence | ||
| OpenGraph | Image | 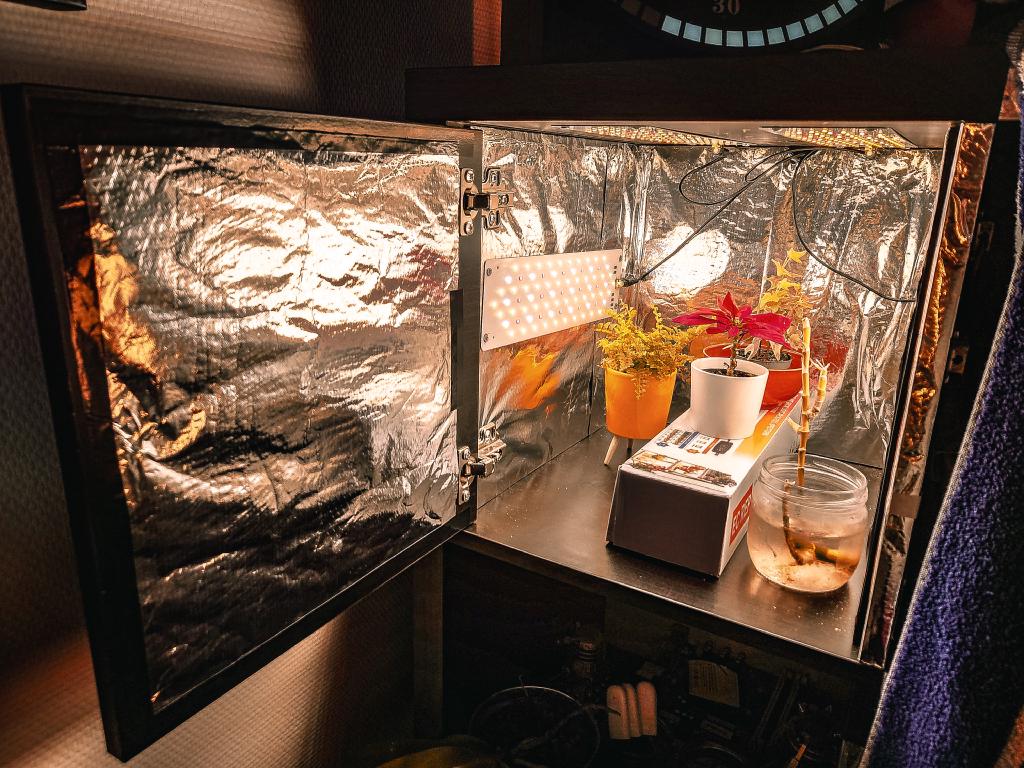 | |
| Title | Making plants grow inside Ikea Kallax furniture | ||
| Description |
| ||
| Type | og:type = article twitter:card = summary_large_image | ||
| Promotions |  Mastodon Mastodon | https://mamot.fr/deck/@ztec/112049617036664292 | |
 Twitter Twitter | https://twitter.com/Ztec6/status/1765409827889586429 | ||
Found a typo, or something bigger that probably killed a grammar nazy ? suggest a fix via github.
You can subscribe via
 RSS to get new articles as son as they are published